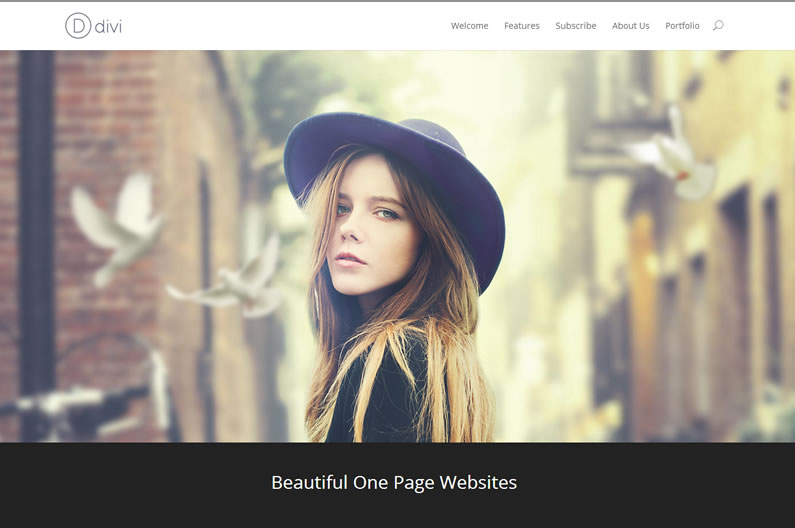
Something that’s hugely popular in website design at the moment is long-format, single-page websites. The homepage is broken down into sections and the top navigation links to those sections and smoothly scrolls you down to whichever section you choose.
Some of the more up-market sites also have a “this is where you are” side navigation bar and a “back to top” icon at the lower right.
Not all WordPress themes will allow you to produce this type of website without a lot of coding, but with the release of Divi 2.1, setting up a single page website with Divi is a breeze.
When you create a new page, you can easily enable Divi’s Single Page navigation option, giving your visitors a visual and clickable representation of their progress on the page. You can also use custom anchor links and Section ID’s to create one-page menus for the complete One-Page package.
Nick Roach – Elegant Themes
Creating your Divi One-Page Website with smooth scrolling internal links
Let’s start by looking at how easy it is to create your one-page website and then we’ll look at each element in more detail.
This video from the Divi help and documentation runs you through the full process… in just under four minutes:
That’s how easy it is folks but just to remind you, this is what your site needs to perform well as a one-page website:
- A long-format page split into Sections – since this page is your whole website it needs to be long, but it needs to be split into manageable sections. That’s exactly what the Divi Pagebuilder does: it splits the pages you create into Divi Sections.
- A Floating side navigation bar – for long pages it’s nice to know where you are on the page. The Floating side navigation bar shows you exactly where you are and allows you to quickly jump between Sections.
- A main header Menu with links to your various Sections – for a one-page website you don’t want your menu links to point to other pages, you want them to point to the various sections of your long-format page. Divi makes it easy to give your Sections specific IDs and then point the main header menu links to those Section IDs.
- A back-to-top icon – not essential, but it adds that extra little bit of je ne sais quoi to your website plus smooth scrolling is great fun and makes for a glorious viewing experience.
A long-format page split into sections – perfect for the Divi builder
Divi is the perfect theme for creating long-format pages with vertical separation because that’s exactly how you build pages with the Divi Builder.
If you’re not familiar with the Divi Builder check out my post An overview of the awesome Divi Builder, which tells you all you need to know to start building your pages.
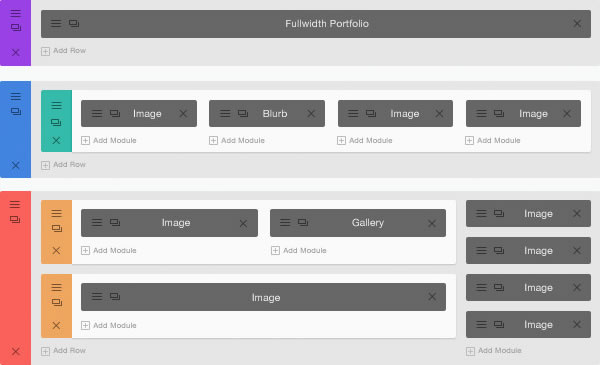
The screenshot below shows you how a typical page looks in your WordPress dashboard. This one is made up of three sections: a Full-width Section (Purple), a Normal Section (Blue) and a Speciality Section (Red).
The Power of the Awesome Divi Builder
The Divi Builder was made with user experience at the forefront of its priorities. The builder transforms elements into visual building blocks, allowing anyone to understand and edit the structure of their page without touching a single line of code.
There are no limitations as to how builder elements can be customized and arranged, making Divi the most flexible theme we have ever created. Divi will change the way you build websites forever. Elegant Themes
Floating side navigation bar – lets you easily navigate long-format pages
Now that we have a long-format page it would be nice to know where we are on the page: that’s where the Floating Side Navigation bar comes in.
The floating side navigation bar appears on the right side of your page and it consists of a number of small circles, which are clickable links to each section on your page. Users can click the circles to scroll to different Sections on the page. It makes it easier to identify where you are on the page and it makes it easier to navigate long-format pages.
When you add a new Section, a new circle link will be added automatically to your floating side nav bar.
The image below shows a page with side navigation enabled and an inset of the ET Settings On/Off option, which is used to turn on the side navigation.
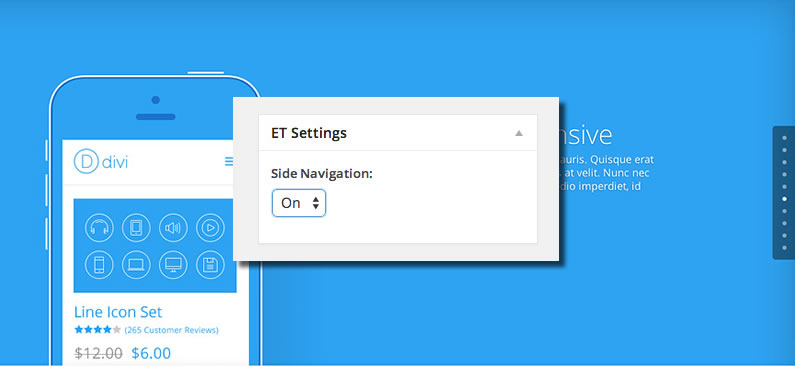
Enabling the side navigation bar is done on a page by page basis from within your WordPress dashboard when you create or edit a page.
Within the page editing area look for the “ET Settings” box to the right of your text editor. Select “On” from the dropdown menu and save the page.
The floating side navigation bar will now appear on the right side of your page.
Side Nav – Using Divi’s side navigation bar, your users can easily click through your long format, single page websites.
Transform your main header navigation into one-page navigation
In addition to side navigation, you can also transform your main header navigation into one-page navigation.
Instead of pointing to other pages, Divi allows you to point your main header menu links to Sections within your one-page site and scroll to those Sections using a smooth scrolling effect.
Transforming your main header navigation is a two stage process:
- Assign an ID to each Section of your one-page website
- Point the main header menu links to your Sections
#1 – Assign an ID to each Section of your One-Page Website
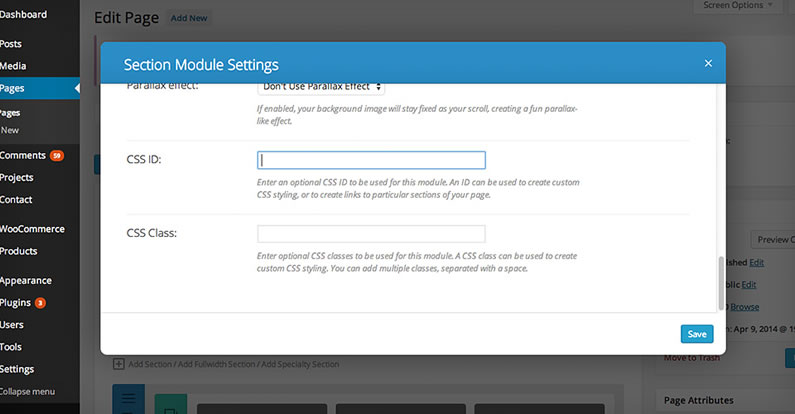
You assign an ID to a Divi Section by clicking on the section settings icon and looking for the “CSS ID” setting. Once an ID has been assigned, you can then link to it from the navigation menu.
For example, if you have a Section called “About Us” and you want it to link to that part of your page. Edit the section that contains your About Us content, and enter “aboutus” into the “CSS ID” field and click “Save.”
That Section now has an ID and you can point a link to it.
#2 – Point the main header menu links to your Sections
Before you can add links to your header menu you need to create a new menu and assign it to the Main Navigation location. You can create a new WordPress menu via Appearances > Menus in your WordPress Dashboard.
If you’re not familiar with WordPress Menus check out this great video tutorial.
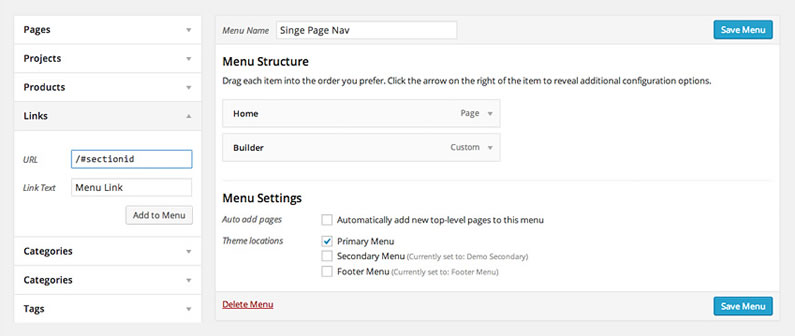
To create a custom menu link, you need to add a new link to your WordPress menu by clicking the “Links” tab on the left hand side of the WordPress Menu page. Clicking the “Links” tab will reveal two fields: “URL” and “Link Text”.
For the “Link Text” enter the text that you want to display in your menu (For example, “About Us”).
For the “URL”, you need to link to the ID that you assigned to your Section earlier. In this case, you added the ID “aboutus” but you can add any ID name that you like. Since you used the ID “aboutus,” you can link to that ID by creating a URL pointing to “/#aboutus” – note the /# in front of the actual ID.
Use the same method to create custom links to all your Sections – simply enter a URL of “/#” followed by the ID that you want to target.
A back-to-top icon – the icing on the cake
You now have a fully functioning one-page website but let’s add one final touch, a back-to-top icon complete with smooth scroll.
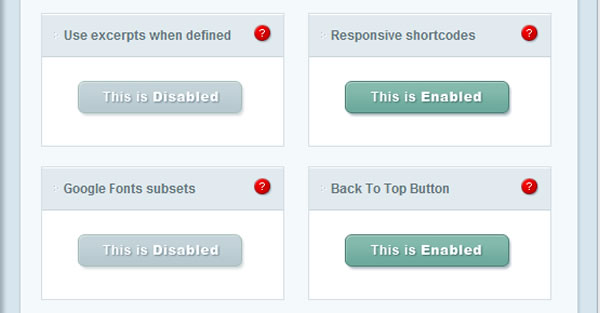
The back-to-top icon is enabled on a site-wide basis from the Elegant Themes ePanel via Appearance > Divi Theme Options and from the ePanel General page scroll down to “Back To Top Button” and enable and save.
That’s it – you now have a great looking back-to-top icon on all your pages and posts that takes you smoothly back to the top.
Pick up your copy of Divi and start creating that one-page website
Divi is the perfect theme to create unlimited page layouts using its simple drag and drop pagebuilder interface and with the new features added to Divi 2.1 it’s now the perfect theme to create your one-page websites.
To get started with Divi, sign up with Elegant Themes, download your copy of the Divi 2.1 pagebuilder theme and start creating your own perfect one-page website.
We offer no-questions-asked refunds to all customers within 30 days of your purchase. If you are not satisfied with our product, then simply send us an email and we will refund your purchase right away. Our goal has always been to create a happy, thriving community. If you are not thrilled with the product or are not enjoying the experience, then we have no interest in forcing you to stay an unhappy member.
Nick Roach – Elegant Themes
I hope that you enjoyed the post and that I’ve shown you how easy it is to create a one-page website with the Divi theme and maybe inspired you to create your own.
If you have any thoughts about Divi please leave a comment and if you’d like to spread the word about this fabulous theme please use the social icons below.
Credits:
My thanks and gratitude to Elegant Themes for the graphics, videos and details of the Divi features used in this post.
