Divi has always made it easy to customise your website using the Divi Builder’s Settings interface and with Divi 2.6… it just got a whole lot easier.
The Settings interface has three tabs: General Settings, Advanced Design Settings, and Custom CSS.
You’ll find almost everything you’ll ever need under the General settings, more detailed styling controls can be found under the Advanced Design Settings and for adding those final flourishes and touches you can use the Custom CSS tab.
In Divi 2.6 Elegant Themes have checked all the Divi Modules for missing elements under the Custom CSS tab and added any that were missing. Adding these selectors means that now, every part of every Module is completely editable.
In this post I’ll run through the Settings panel for Modules and then look at a real world example of adding custom CSS using both the Divi Theme Options (formerly known as ePanel) and the improved Custom CSS tab of the Module Settings panel.
My Affiliate Links Disclosure
Hi everyone. Just to let you know that many of the links on this site are my affiliate links. What that means is that if you click one of them and buy something… I get a commission. It doesn’t cost you anything extra and I only recommend things that I’ve tried and tested, so please, please, please… use my links.
A quick reminder of the Module Settings panel
Although the Module Settings interface has three tabs, General Settings, Advanced Design Settings, and Custom CSS, most of what you’ll ever need is under the General Settings and you may never need to use the Advanced Design Settings or the Custom CSS tab.
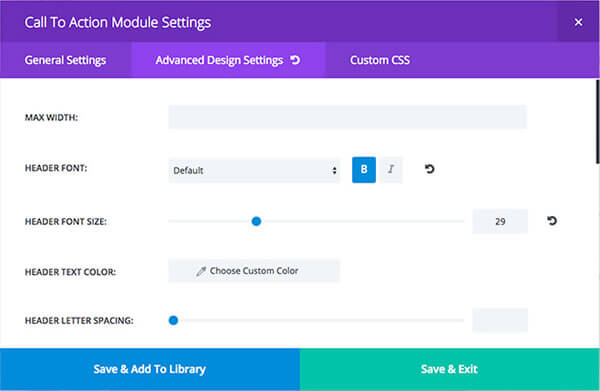
However if you need more detailed styling controls you can use the Advanced Design Settings and for adding your own CSS you can use the Custom CSS tab.
This video by Nick Roach from Elegant Themes runs you through both the Advanced Designs Settings and Custom CSS tabs.
The CSS problem to solve using Divi’s Custom CSS features
The graphic below is a screenshot of the Fullwidth Header on this site’s homepage.
It was created using the Divi Fullwidth Header Module and I wanted the TITLE “Welcome to the creative and colourful world of Divi” to be in a very narrow font but only for this particular Fullwidth Header Module and only on my homepage.
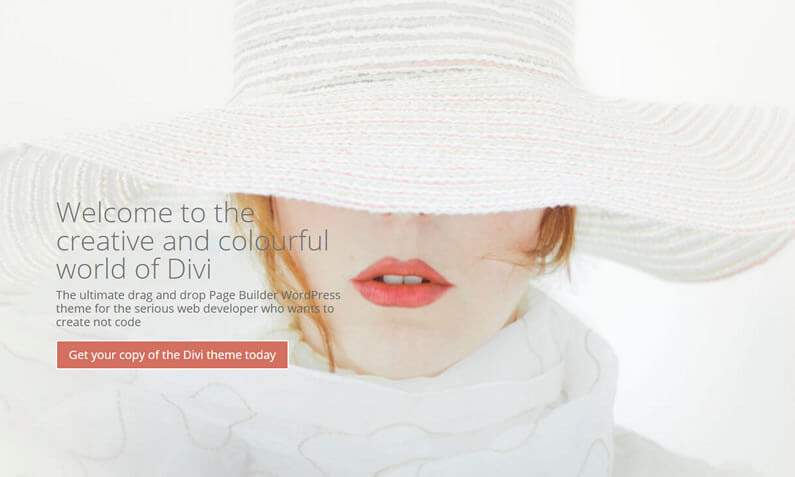
I was happy with the default font but the default “font-weight” was 500, which was too thick.
Since there isn’t a section for “font-weight” in the Advanced Design Settings of the Fullwidth Header Module, and the TITLE element doesn’t appear under the Custom CSS tab, the only solution is to add a soupçon of Custom CSS.
Check out the two methods of adding Custom CSS, which I cover below.
Adding Custom CSS using the Divi Theme Options (formerly ePanel)
The traditional way to add Custom CSS to Divi is via the Divi Theme Options (formerly ePanel).
From your WordPress dashboard go to Divi > Theme Options and scroll to the bottom of the Divi Theme Options panel until you come to the Custom CSS input area – see screenshot below.
Type in your Custom CSS and save the changes – you can see the CSS I used to target the TITLE of the Fullwidth Header Module for this specific page, in the screenshot below.
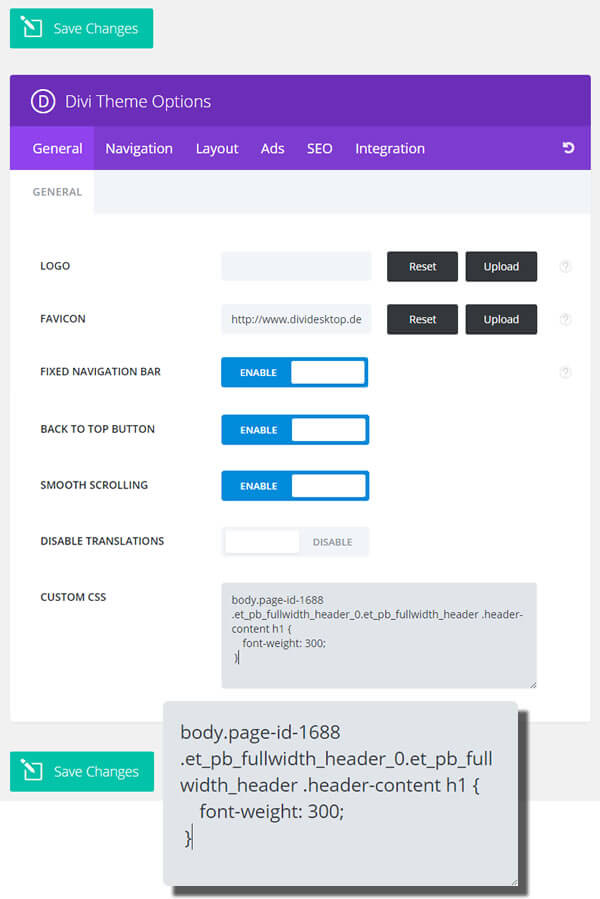
As you can see from the graphic, I have had to specify the selector (body.page-id-1688 .et_pb_fullwidth_header_0.et_pb_fullwidth_header .header-content h1) and the declaration (font-weight: 300;) and the selector is pretty complicated.
One of the problems of adding your own CSS is finding the selector that you need to target. To help you find the selector you need, when adding Custom CSS, check out my post Firebug, Chrome Dev tools and CSS Hero
Learning CSS… and maybe a little html
You may never be, or even want to be, a Divi or WordPress developer but knowing a bit of CSS and html can be useful and doing your own styling is very satisfying.
Here are a couple of free web resources to get you started:
CSS guides and tutorials graded as beginner, intermediate and advanced and all the resources use CSS3.
HTML guides and tutorials again graded as beginner, intermediate and advanced and all the resources use HTML5.
Adding Custom CSS using the Custom CSS Editing Options
In Divi 2.6 all Divi Module elements now have their own input area under the Custom CSS tab, including the TITLE element for the Fullwidth Header Module.
That means that once you’ve located the TITLE input box, all you have to add is the declaration part of the CSS we want, which in our case is: font-weight: 300;
The CSS selector appears above each text field after the element name and in our case the CSS selector is: .et_pb_fullwidth_header_0 .header-content h1
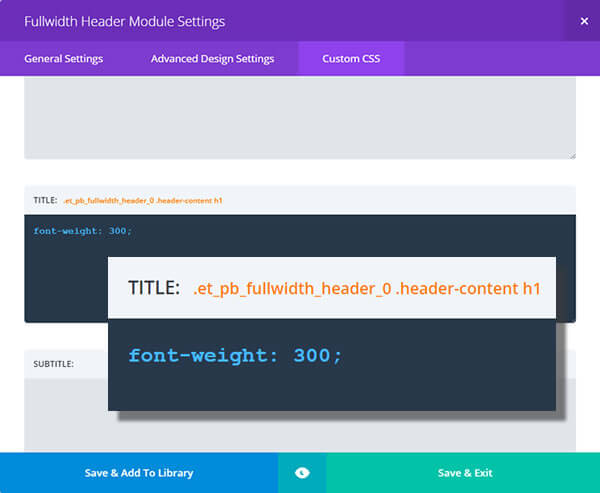
You can probably see that adding your Custom CSS via the Module Settings Custom CSS tab is much easier than adding it via the Divi Theme Options (formerly ePanel).
When you use the Custom CSS Editing options you only have to add the declaration part of the CSS because the selector part is taken care of by Divi… we love you Divi 2.6.
Customise your site with the fabulous Divi 2.6 Custom CSS Editing Options
With the release of Divi 2.6 customising your site, to give it the look and feel that you want, got a whole lot easier.
All Divi Module elements now have their own input area under the Custom CSS tab, which means that you can target every element of every Module on every page and customise your site to your heart’s content.
If you’d like to start using the Divi theme to customise your site, then sign up with Elegant Themes, download your copy of Divi and watch your creative ideas turn into reality.
Add the power of the Divi Builder to your site… whatever theme you use!
If you want to add the power of the Divi Builder to your WordPress website, but you want to keep your existing theme, then you need the Divi Builder plugin.
The Divi Builder is a plugin, which works with any WordPress theme and allows you to add all the Divi Builder’s functionality to your website.
This is an example of a page created with the Divi Builder plugin, on a Genesis theme website.
We have audited the full list of Divi Modules to make sure there were no missing elements with the Custom CSS tab.
Dozens of new CSS options have been added, making every single part of each Module completely editable.
We have also made these settings easier to use by adding the CSS Selector to each text field, making it clear exactly where your CSS is being added.
Nick Roach – Elegant Themes
I hope that you enjoyed the post and that it’s given you a useful introduction to the new Divi 2.6 CSS Editing options.
If you have any thoughts about Divi in general or the new Editing options in particular, then please leave a comment and if you’d like to spread the word about this fabulous Drag and Drop theme, please use my social sharing icons below.
Credits:
My thanks and gratitude to Elegant Themes for the video, graphics and details of the new Divi 2.6 Modules Custom CSS editing options used in this post.
